An informative guide to Hardie Plank Siding Installation
Embarking on the journey of Hardie Plank siding installation, this guide aims to provide a comprehensive overview of the process, highlighting key aspects and best practices to ensure a successful outcome.
Exploring the nuances of Hardie Plank siding installation, this guide delves into the intricacies of proper techniques, challenges faced, and essential considerations for a seamless finish.
Introduction to Hardie Plank Siding Installation

Hardie Plank siding is a durable and low-maintenance fiber cement siding product that is designed to withstand harsh weather conditions and resist damage from pests and rot. Its benefits include longevity, fire resistance, and the ability to mimic the look of traditional wood siding without the maintenance requirements.Proper installation techniques are crucial when it comes to Hardie Plank siding to ensure its longevity and optimal performance.
This includes following manufacturer guidelines, using the right tools and materials, and paying attention to details during the installation process.
Common Challenges During Hardie Plank Siding Installation
- Improper cutting and fitting: Accurate measurement and cutting of Hardie Plank siding panels are essential to ensure a seamless and secure installation.
- Inadequate sealing and caulking: Proper sealing around edges, corners, and joints is necessary to prevent water infiltration and maintain the siding's integrity.
- Incorrect fastening: Using the wrong nails or screws, or not securing the siding properly, can lead to loosening, warping, or other structural issues over time.
- Moisture management: Failure to address moisture issues, such as improper drainage or ventilation, can result in mold, mildew, and other moisture-related problems behind the siding.
Pre-Installation Considerations
Before diving into the installation of Hardie Plank siding, there are several key considerations to keep in mind to ensure a successful outcome.
Tools and Materials Needed
- Hardie Plank siding panels
- Tape measure
- Pencil
- Straight edge
- Circular saw with a carbide-tipped blade
- Nails or screws
- Hammer or screwdriver
- Level
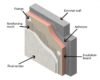
Preparing the Surface
Properly preparing the surface before installing Hardie Plank siding is crucial for ensuring its longevity and durability. This includes:
- Cleaning the surface to remove any dirt, debris, or old paint
- Repairing any damaged areas or replacing rotten wood
- Applying a weather-resistant barrier to protect against moisture
- Ensuring the surface is flat and even to prevent any issues during installation
Measuring and Estimating Siding Quantity
Accurately measuring and estimating the quantity of siding needed is essential to avoid running out of materials mid-installation. Here's how to do it:
- Measure the height and width of each wall where the siding will be installed
- Calculate the square footage of each wall by multiplying the height by the width
- Sum up the square footage of all walls to determine the total square footage needed
- Factor in extra siding for waste, cuts, and mistakes by adding around 10% to the total square footage
Installation Process
When it comes to installing Hardie Plank siding, following a step-by-step process is crucial to ensure a seamless and professional finish. In this section, we will detail the installation process, discuss best practices for cutting and fitting the siding, and share tips for achieving a high-quality result.
Step-by-Step Installation Process
- Start by preparing the surface where the siding will be installed, ensuring it is clean, dry, and in good condition.
- Measure and cut the siding panels to fit the dimensions of the area, taking into account any windows, doors, or corners that may require special cuts.
- Install the starter strip at the bottom of the wall, making sure it is level and properly aligned.
- Begin installing the siding panels, starting from one corner and working your way across the wall horizontally.
- Use a nail gun to secure the panels to the wall, making sure to follow the manufacturer's guidelines for spacing and placement.
- Continue installing the siding panels row by row, overlapping each panel slightly to create a watertight seal.
- Finish the installation by adding trim pieces around windows, doors, and corners to complete the look.
Best Practices for Cutting and Fitting
- Use a circular saw with a fiber cement blade to make clean and precise cuts on the siding panels.
- Measure twice and cut once to avoid wasting materials and ensure a perfect fit.
- When fitting the siding around windows and doors, leave a small gap for expansion and contraction to prevent buckling.
- Apply a generous amount of caulk to seal any gaps between the siding panels and trim pieces for added protection against moisture.
Tips for a Seamless and Professional Finish
- Take your time and pay attention to detail to ensure a high-quality result.
- Work methodically and follow the installation instructions provided by the manufacturer.
- Use a level and square to ensure the siding is installed straight and true.
- Step back periodically to check the overall appearance and make adjustments as needed.
Finishing Touches and Maintenance
After the installation of Hardie Plank siding, it is essential to focus on the finishing touches to ensure the longevity and aesthetic appeal of your home. Additionally, proper maintenance is crucial to keep the siding in top condition for years to come.
Painting or Sealing Hardie Plank Siding
When it comes to painting Hardie Plank siding, it is important to follow the manufacturer's instructions carefully. Before painting, make sure the surface is clean, dry, and free of any dust or debris. Use high-quality acrylic latex paint for best results, and apply it evenly with a brush or roller.
It is recommended to apply two coats of paint for a durable finish.If you prefer to seal the Hardie Plank siding instead of painting it, there are specific sealants available that are compatible with the material. Follow the manufacturer's guidelines for application and reapplication to maintain the protective barrier against moisture and UV damage.
Maintenance Tips
- Regularly inspect the siding for any signs of damage, such as cracks, chips, or moisture penetration.
- Clean the siding at least once a year using a mild detergent and a soft brush or cloth to remove dirt, grime, and mildew.
- Trim back any vegetation or trees near the siding to prevent damage from branches or roots.
- Check the caulking and seals around windows, doors, and other openings to ensure they are intact and watertight.
- Avoid using high-pressure washers on the siding, as it can damage the surface and void the warranty.
- Consider applying a fresh coat of paint or sealant every 5-7 years to maintain the appearance and protection of the siding.
Final Conclusion
In conclusion, mastering the art of Hardie Plank siding installation requires attention to detail, precision, and a commitment to quality. By following the guidelines Artikeld in this guide, you can achieve a durable and aesthetically pleasing result that enhances the overall appeal of your property.
FAQ Summary
What are the benefits of Hardie Plank siding?
Hardie Plank siding is durable, resistant to rot and pests, low maintenance, and comes in a variety of styles to enhance the aesthetic of your home.
What tools are needed for Hardie Plank siding installation?
Common tools include a circular saw, tape measure, hammer, nails, and safety gear such as gloves and goggles.
How do you estimate the quantity of siding required?
To calculate the amount of siding needed, measure the height and width of each wall, subtracting the area of doors and windows, and add 10% for waste.